Setting Up the Portal
Before sharing portal links with clients and agents, use the transaction Portal tab to check the visitor experience, manage links, and customize the look and feel for that transaction.
Portal tab workspace
Open a transaction and go to Portal. The page is split into a management area and a live preview:
- Stats — Active links, total visits, unique visitors, and document downloads for that transaction.
- Portal links — Each link shows portal type, status, recipient, visit count, and last access date when available.
- Share Portal — Send portal-link invitations to selected contacts or manual email addresses.
- Branding — Override the portal logo, colors, and banner text for this transaction.
- Recent activity — Review recent visitor activity when tracking data is available.
- Preview — Select a link and view the portal in mobile or desktop mode before sending it.
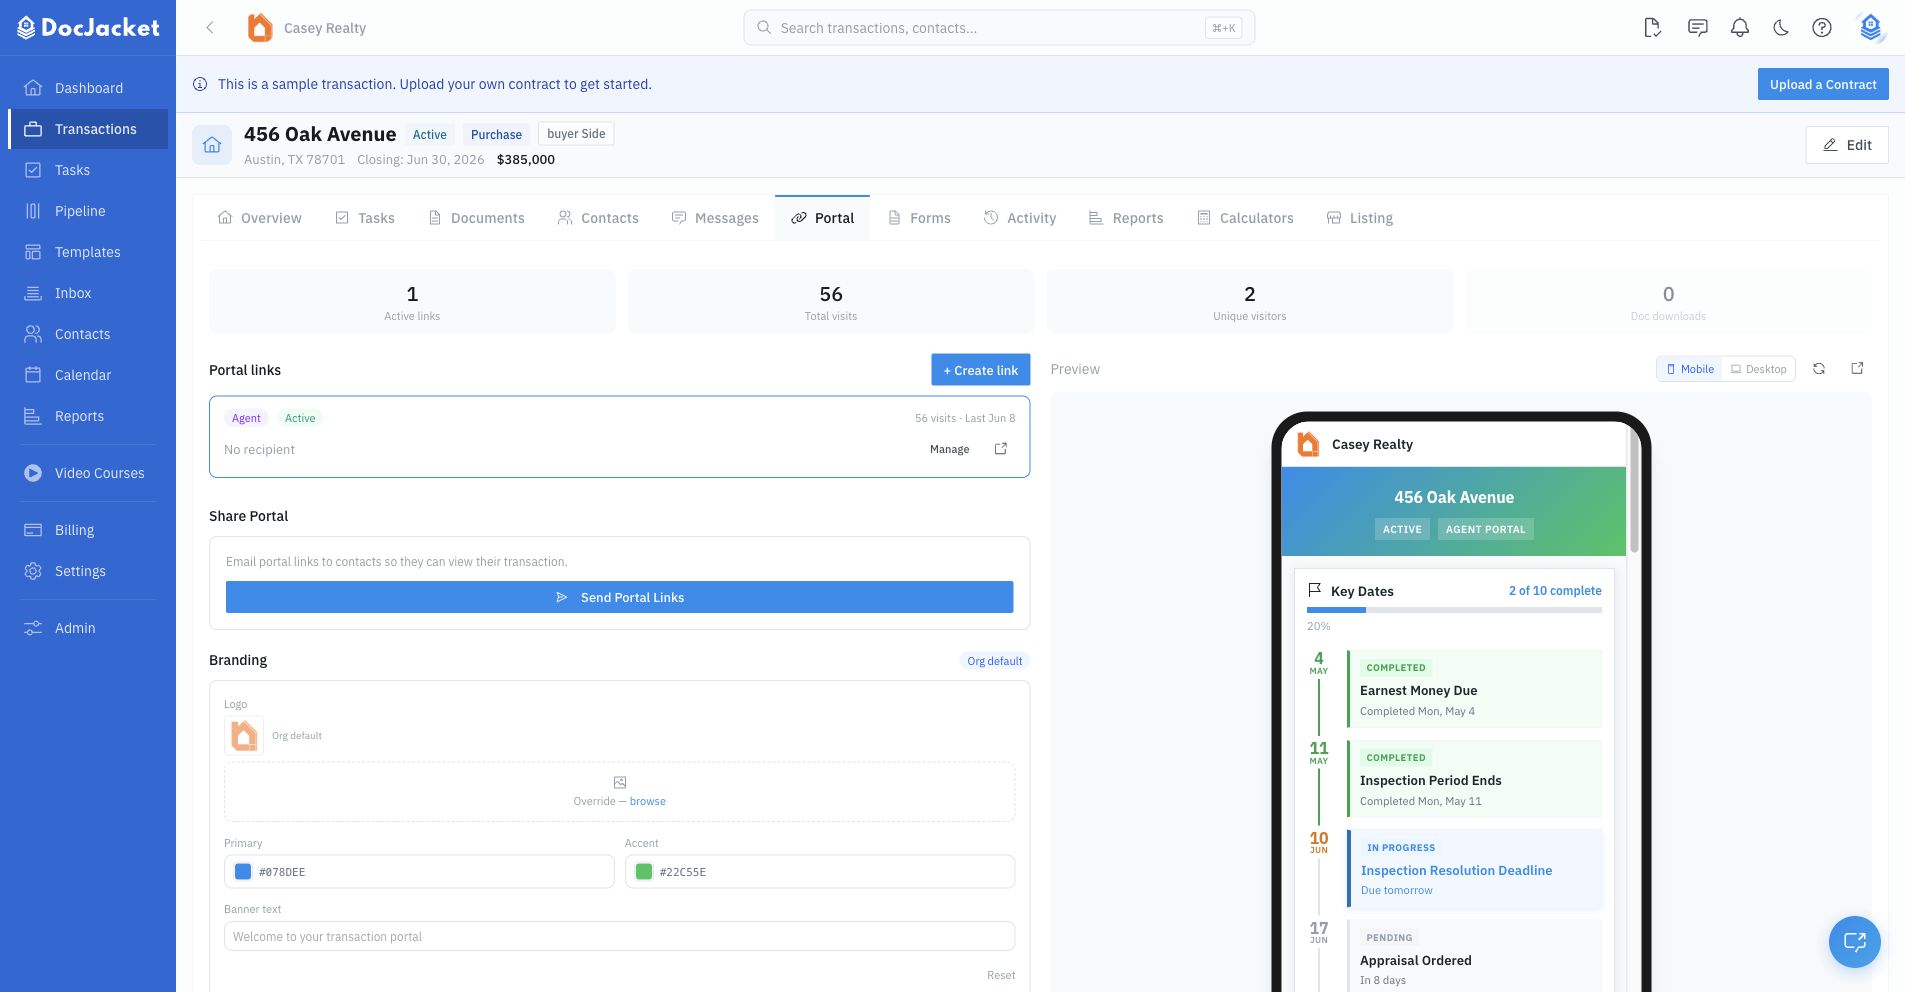
Branding
The branding panel uses your organization defaults unless you set a transaction-specific override:
- Logo — Upload the logo that appears in the portal header. Supported image types are JPG, PNG, GIF, and WebP, up to 5 MB.
- Primary color — Used for the portal navbar, buttons, and links.
- Accent color — Used with the primary color in the hero area and banner styling.
- Banner text — Adds a short colored message bar above the portal header.
- Reset — Remove transaction overrides and return to organization defaults.
Live preview
The preview panel shows the selected portal link in an embedded mobile or desktop frame. Use it to confirm what that exact recipient will see before you send the link.
You can also refresh the preview or open the portal in a new browser tab. If no link exists yet, create a portal link first so DocJacket has a recipient-specific portal view to preview.
What's shown on the portal
The public portal is primarily a branded overview page. Depending on the portal type, shared data, and visibility settings, it can show:
- Transaction address, status, and portal type badge
- Key dates and deadlines
- Portal-visible documents grouped by category
- Portal-visible tasks with completion progress
- Buyers, sellers, agents, title, lender, and service providers
- Property reference fields such as escrow number, MLS number, or APN
- Calendar subscription, print, and one-page PDF actions
- A property switcher when the same contact has access to multiple active transactions
You control visibility at the document and task level, so sensitive items stay private unless you specifically share them. Document visibility can also be restricted to selected portal contacts and can allow or withhold portal download controls. Agent portals may also show agent-facing financial details and recent activity that client portals do not show.
Contact visibility and private details
Open the transaction's Contacts tab and expand the contact. Use the eye button to hide that contact entirely from the portal, portal PDF, and newly generated SitRep reports. It does not remove the contact from your internal transaction.
To keep the name and role visible while restricting the email and phone, use Portal contact details:
- Everyone with a portal link shares the details with all viewers.
- Selected portal viewers shares them only with the deal contacts you select.
- No portal viewers keeps the email and phone out of every portal view.
If you choose Selected portal viewers and leave everyone unchecked, then click Save detail visibility, no portal viewer can see that contact's email or phone—including the listing agent. The contact's name and role remain visible unless you hide the entire contact with its eye button. An empty selection here does not mean everyone; task portal visibility uses a different rule.
Click Save detail visibility. These detail restrictions also apply to the portal PDF. Generic links and legacy links that cannot identify one viewer show restricted contacts' names and roles only. An agent link does not bypass the selection.
SitRep reports are different: Selected portal viewers and No portal viewers do not restrict contact details in ordinary SitRep reports, including newly generated SitReps. SitReps use the contact's overall eye-button visibility instead. To omit the contact from a new SitRep, hide the entire contact with its eye button. No setting changes a SitRep or PDF that someone already downloaded.
Check the exact recipient's link in the Portal tab preview. Previously downloaded PDFs cannot be recalled; generate a new copy after changing visibility. Contact merges keep the more restrictive visibility and may require you to select the intended viewers again.
Link management
From a link's detail drawer, you can copy or open the URL, send it by email, review access counts and last access details, check the calendar feed status, extend expiration by 7 days, revoke access, reactivate a revoked or inactive link, or delete a link you no longer need.
Use revocation when access should stop immediately. Use expiration when you want the link to stop working automatically after a set period.