Email Automation
Link email templates to tasks so the right email is ready at the right point in the workflow. Task email automation can prepare an email for review, send an email automatically, schedule an email relative to a task due date, and include configured recipients or documents.
Worried the system might email a client something you didn't want? It won't. By default, automations draft the email and hold it in your Review queue for one-click approve, edit, or skip — a client or agent never hears from DocJacket until you say so. Sending automatically is strictly opt-in, per email. You can also turn on an organization-wide safety switch so every automated email waits for review (see Review before sending below). This "draft-and-review" habit is how our most active coordinators send hundreds of emails with near-zero mistakes.
Most task email automation starts in a Playbook template, then becomes editable transaction-specific automation after the Playbook is applied. Use templates for repeatable workflows; use the transaction task drawer when a real deal needs an adjustment.
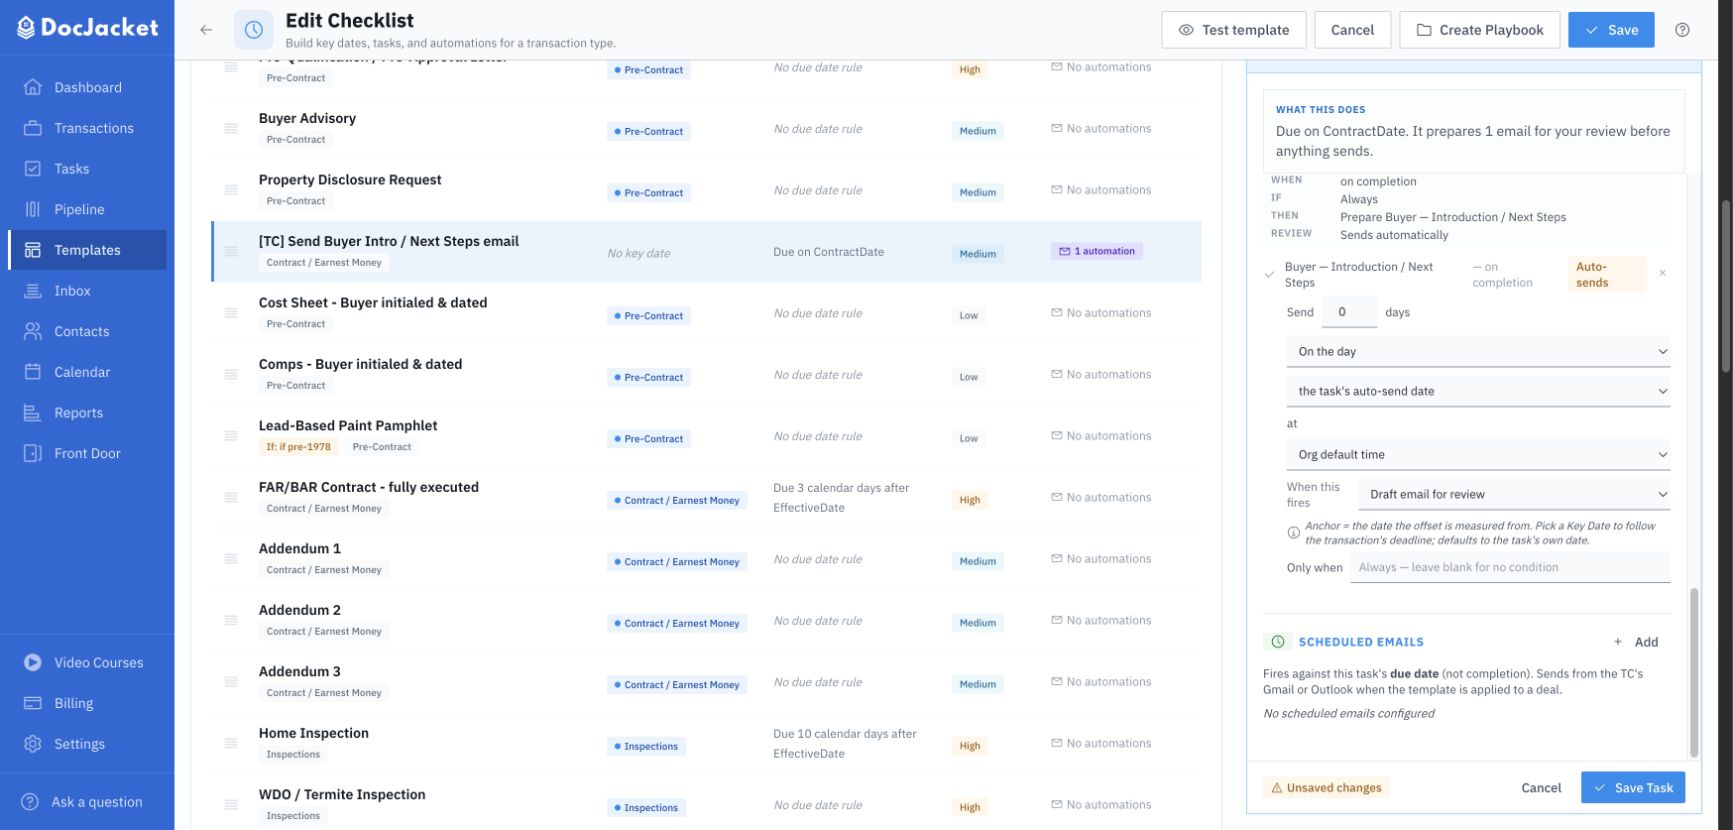
When a task email fires
An email linked to a task has two moments where it can fire. Understanding these two moments explains almost everything about task email behavior.
| Moment | When it happens | What it does |
|---|---|---|
| Its date arrives | The email's own date — the task's due date (or auto-send date) plus any offset — is reached | Depends on the email's delivery mode: prepare the email, or just notify you |
| You complete the task | You check the task off | Prepares the email for your Review queue |
The same linked email carries both. You don't choose one or the other — you configure the email once, and set its date and its delivery mode.
For each linked email you can configure:
- Email template
- Offset and anchor — such as 3 days before the task due date, or on a Key Date like Closing
- Send time
- Weekend or holiday fallback rule
- Delivery mode — draft the email, or just notify you
- Whether it waits for review before sending
- Recipients
- Attached documents
Example:
- Task: Confirm closing appointment
- Due: Closing Date - 3 days
- Linked email: Send closing reminder 1 day before the task due date at 8:00 AM
Emails prepared this way send from your connected Gmail or Outlook account when one is available. Upcoming or held date-based emails appear in the Review queue's Scheduled tab, where they can be edited, sent now, or cancelled when supported.
Delivery mode
Every linked email has a When this fires setting that controls what happens when its date arrives:
- Draft email for review (the default) — DocJacket prepares the email and puts it in your Review queue to approve, edit, or skip. This is what most emails should be.
- Just notify me in-app — DocJacket posts an in-app notification telling you the milestone hit, and prepares no email at all. Nothing lands in your Review queue.
Choose Just notify me in-app when the date is only a heads-up for you — "the inspection deadline is coming up" — and you don't want a draft email to clear off your queue every time. Coordinators who review their whole pipeline each morning often prefer this for deadline milestones.
This is the part worth remembering. "Just notify me in-app" changes what happens on the email's date. It does not change what happens when you complete the task. Check the task off and the email is still prepared for your Review queue, ready to send — even if the notification already went out that morning.
So a task like "Title commitment received" can quietly notify you when the date passes, and still give you the email to send the moment you actually complete it.
Where to set it
You can set the delivery mode in two places:
- On a Playbook template — open the Playbook, expand the task's reminder, and use When this fires under the timing controls. Every deal created from that Playbook inherits your choice. Set it here when it should apply to all future deals.
- On a single deal — open the transaction, click the task, and use When this fires in the Task emails section of Task Details. This changes only that one deal.
Reading the status on a task
In the Task emails section, each linked email shows what has already happened to it:
- Sent {date} — the email was prepared and sent.
- Notified in-app {date} — not sent — this was a notify-mode email. You got the in-app heads-up on its date; no email was sent. You can still send it yourself with Review & send, and completing the task will prepare it too.
If an email has already been sent, its Review & send button goes away — there is nothing left to send. Notify-mode emails keep the button, because a notification isn't an email.
Configuring automation in a Playbook
Use Playbook templates when the same task should prepare or schedule the same email every time the workflow is applied.
- Go to Templates → Playbooks
- Open a Playbook in My Playbooks
- Open the Tasks or Automations view
- Select the task that should trigger the email
- Add the email reminder
- Choose the email template
- Set the timing — offset, anchor date, and send time
- Set When this fires — Draft email for review or Just notify me in-app
- Set recipients and document attachments
- Save the Playbook
Shared system Playbooks are read-only. Copy a shared Playbook before adding or changing email automations.
When the Playbook is applied, DocJacket copies those automation rules onto the transaction's tasks. The copied rules can then use that transaction's contacts, dates, documents, and smart-field data.
Adjusting automation on a transaction
Use the transaction task drawer when the automation exists only for one deal, or when a template-created rule needs a one-off change.
- Open the transaction
- Go to the Tasks tab
- Click the task row to open Task Details
- Open Task emails or Scheduled emails
- Link an email template, or edit the copied automation
- Confirm recipients, attachments, and date anchors
- Confirm When this fires — the delivery mode for this deal
- Save the task
Completing a task with review-required email automation prepares the email for the Review queue. Setting a date on the email means it can also fire on that date — see When a task email fires.
Changes made here apply to this deal only. To change how future deals behave, edit the Playbook template instead.
Recipients and documents
Task email automation can use:
- To, Cc, and Bcc recipient types
- Contact roles from the transaction
- Direct email addresses where supported
- Document categories or selected document attachments
The linked email template still controls the subject, body, smart fields, and any template-level auto-attachments.
Build and test the template in Templates > Email Templates first. The Playbook automation controls decide when the email is prepared or sent, while the email template controls the content, default recipient logic, and template-level document attachments.
Where recipients come from
Recipients can be set in two places, and they work together:
- On the task's linked email — the recipients you set here always win for that email.
- On the email template, under Recipients by Role — used as the fallback whenever the linked email has no To recipient of its own.
So if you set Recipients by Role on a template, every task using that template picks those recipients up automatically. You only need to set recipients on an individual task when that one task should go to someone different.
An email template also has an Audience field. That one is for search and filtering — it helps you find templates on the Templates page. It does not decide who the email goes to. Use Recipients by Role (or the task's own recipients) to set actual recipients.
If no To recipient can be resolved — for example the role has no contact assigned on that deal — DocJacket does not send the email to the wrong person or drop it silently. It parks a card in your Review queue asking you to choose a recipient, and notifies you. Add the recipient on the card and it becomes sendable.
Review before sending
You control whether an automated email waits for your approval or sends on its own, at two levels:
- Per email (the default). Every on-completion email has a Require review before sending switch, and it's on by default. While it's on, completing the task drafts the email into your Review queue instead of sending it. Uncheck it only when you want that specific email to send automatically.
- Organization-wide (the safety net). In Settings > Organization, turn on Review auto-emails before sending to force every automated email across your account to wait in the Review queue for one-click approve, edit, or skip — regardless of the per-email setting. This is the recommended setting if you're new to automation or simply never want an email leaving without a final human look. Drafts auto-expire after your retention window if you don't act on them.
Either way, the promise is the same: nothing reaches a client or agent until you approve it. Automation does the tedious part — picking the template, resolving recipients by role, filling smart fields, attaching documents — and leaves the send button to you.
Runtime review
When the Playbook is applied to a transaction, DocJacket creates the tasks and their email automation rules. Before sending or parking a draft for review, DocJacket renders smart fields against that transaction.
If data is missing or a placeholder is unrecognized, review the email before sending. Missing transaction data should be fixed on the transaction. Unrecognized placeholders should be fixed in the email template.
Review-required emails appear in the topbar Review queue under Ready for Review. Scheduled emails appear under Scheduled when they are waiting, held, or ready for schedule management. Nothing sends from the review-required path until a user approves, sends, skips, or dismisses the prepared email.
Tips
- Use Require review before sending for client-facing or high-risk emails.
- Use Just notify me in-app for date-based deadline heads-ups you don't want to clear off your queue — you'll still get the email when you complete the task.
- Use Draft email for review for anything that should actually reach a client or agent on its date.
- Set the delivery mode on the Playbook template so new deals inherit it, rather than fixing each deal one at a time.
- Set Recipients by Role on the email template once, instead of setting recipients on every task that uses it.
- Test the linked email template before attaching it to automation.
- Combine email automation with Playbooks to set up entire email workflows for a transaction type.
If an email didn't appear
If you completed a task and no email showed up in your Review queue, see Why didn't my task email appear? for the short list of causes.